hands on It happens every day. There’s something interesting on your screen that you want to share with others. Perhaps it’s an error message you want to send to support. Or maybe you’re writing instructions for colleagues and you need to outline how to use software. Whatever the reason, you need a screenshot.
There are many ways to take a screenshot in Windows 10 or 11, and some are better for particular tasks such as grabbing just a portion of the screen, mocking up the image with notes, or doing a narrated screen recording. Here are the best ways to capture your screen.
Print Screen key: Easy but blunt
If you saw this headline and thought, “I’ll just hit the Print Screen key and be done,” that is one solution, but not always the ideal one. First of all, not every keyboard has a Print Screen key these days (though you can always remap another key into Print Screen). Second, this method may capture more real estate than you need.
There are three ways to use Print Screen:
- Print Screen alone: This copies the entire desktop to your clipboard, but doesn’t save it. If you’re on multiple monitors, it will copy all of your desktops in one giant image. That’s not ideal if you just want to snip a paragraph out of a web article and post it to social media.
- Windows Key + Print Screen: This saves a PNG of your entire desktop to the Pictures folder. Again, it’s your entire desktop, across all of your screens.
- Alt + Print Screen: This copies the current window to your clipboard. But, if you have multiple windows you want to show – for example, a dialog box that has a parent window behind it – this may not work for you.
Capture parts of the screen with Snipping Tool
Most often, when I’m taking a screenshot, I just want to draw a box around the exact part of the desktop I need. In Windows 11, if you hit Windows + Shift + S, the Snipping Tool will launch with a cross-hair icon that immediately lets you select the portion of the screen you wish to capture. In Windows 10, you get the similar “Snip & Sketch” app when hitting this key combo.
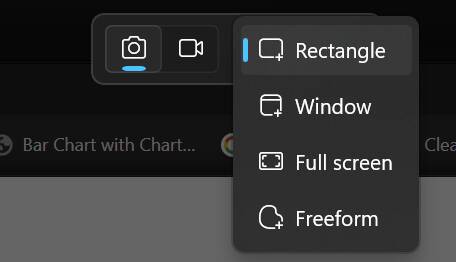
If you choose, you can also select from a pulldown menu, which allows you to capture a window, the full screen, or a freeform shape.

Choose a mode in Snipping Tool – Click to enlarge
After you’ve drawn the box around your selection (or captured a different shape), Windows displays a notification showing what you captured and offering you the opportunity to click through to a “Markup and share” screen. It also automatically copies the screenshot to the clipboard and saves a PNG file of it to the Pictures->Screenshots folder.

Notification from Snipping Tool – Click to enlarge
If you click on “Markup and share,” the Snipping Tool’s main window will open and you will see a few basic editing tools at the bottom of the screen. These include a pen tool for drawing on your image, a highlighter tool, an eraser, and a crop tool. The best tool here is the shapes tool, which allows you to draw boxes or circles around things you wish to highlight.

Snipping Tool window – Click to enlarge
You can then save your screenshot as a file by hitting the save button, open it for editing in Windows Paint, or hit the copy button to copy it to your clipboard. Once an image is in your clipboard, you can paste it into all kinds of social media tools or document editors. For example, I send my friends quotes from interesting articles all the time by pasting them into Slack.
Get time-delayed screenshots using Snipping Tool
Sometimes you need to grab an image of a menu that would disappear the moment you hit the keyboard combo to take a screenshot. That’s where a delayed capture – you invoke the screen shot and then it waits 3, 5 or 10 seconds before firing – comes in.
To use the Snipping Tool for a delayed capture, launch the full program, not by hitting Windows + Shift + S, but by searching for Snipping Tool in Windows Search or finding its shortcut on the Start menu.
Once the window opens, select a 3-, 5-, or 10- second delay from the clock menu (In Windows 10, Snipping Tool allows a delay of up to 5 seconds, and Snip & Sketch offers 3- and 10-second options). Then hit the New button to initiate the capture. However, note that the delay does not work for full-screen captures.

Snipping Tool delayed capture – Click to enlarge
Capture screens from YouTube videos
Sometimes you’re watching a video on YouTube and want to grab a still from it to share. Sure, you could use the Snipping tool and snip around the video, but you’d still have the timeline and play buttons in your screenshot. The best way to grab a frame from a YouTube video is to use a dedicated browser extension.
I recommend installing Screenshot YouTube for Chrome or for Edge, which adds a “Screenshot” button to the bottom of each YouTube video, right next to the closed captioning button. When you click the button or hit a keyboard shortcut, it downloads the current frame as a JPG, which ends up in your JPGs folder. You can also set the extension to copy the image to your clipboard instead.

Screenshot button in YouTube – Click to enlarge
Firefox users should try the YouTube Screenshot button extension.
Capture a full web page
If you work on any kind of website doing development, sales, editorial, or product management, you’ll occasionally want to grab an entire web page as a screenshot. Perhaps you just want to show the boss how ridiculous all the ads are at the bottom of your competitor’s site.
Unfortunately, even if you have an 8K monitor that’s rotated into portrait mode, you probably won’t be able to fit an entire web page on the screen at once. There’s just too much cruft on most modern web pages, even if the meat of the page is relatively small.
In Chrome, the easiest way to grab a complete web page is to use a free extension called GoFullPage. After installing, you just click the camera icon in your browser’s toolbar, wait a few seconds while the extension scrolls down the page, and then you’re presented with an image of the entire thing. You can then download the picture as a PNG or a PDF or hit the edit button and mark it up with shapes, text, or stickers.

Full web page capture in GoFullPage – Click to enlarge
If you’re morally opposed to installing an extension in Chrome, there’s a more complicated way to get the job done. Hit CTRL + SHIFT + J to open developer tools, then CTRL + SHIFT + P to open the “run” command. There you’ll enter “capture full size screenshot” and hit enter. It will save a PNG to your downloads folder.

Capture a full web page in Chrome dev tools – Click to enlarge
In Edge browser, hit CTRL + SHIFT + S and you’ll be presented with a dialog box allowing you to capture an area of the page, capture just what’s visible on screen, or capture the full page. Choose “Capture full page.”

Capture full page in Edge Browser – Click to enlarge
After you’ve done that, you’ll be presented with a screenshot of the page and the opportunity to mark it up or save it.

Edge Browser full page capture screen – Click to enlarge
Firefox also has a built-in feature that captures a full web page for you. Just right click on an empty area of a page and select Take Screenshot.

Take Screenshot option in Firefox – Click to enlarge
Then click the “Save full page” button that appears in the upper right corner of the screen.

Save full page in Firefox – Click to enlarge
You’ll be shown an image of the web page you captured, along with the option to download it as a file or copy it to your clipboard.

Firefox web page capture screen – Click to enlarge
Capturing screenshots with the pointer
Up until now, every screenshot method we’ve shown has assumed that you don’t want the mouse pointer in your image. But what if you do? Windows doesn’t provide an easy way to capture images that include it.
The best built-into-Windows way to capture a screenshot with the mouse pointer is to capture a video using a tool like the Steps Recorder or the video feature of the Snipping tool. Then you can grab a frame from the video and use that.
However, having to go through the hassle of recording a whole video just to grab one frame is annoying. My favorite third-party screenshot tool, PicPick, offers cursor capture as an option.
Using PicPick, the best third-party screenshot tool
Though you can easily use built-in Windows tools for most screenshotting, I prefer PicPick, which is free for personal use and $24 for commercial / business purposes. PicPick has several advantages: In addition to being able to capture the cursor, it allows you to set your own keyboard shortcuts for any of its capture modes, and it can do scrolling captures where it scrolls down the length of an app (good for more than just web pages).
To capture the cursor, go to the Program Options menu by right clicking the PicPick icon in the system tray. Then check “Include cursor image” under the Capture tab.

PicPick Program Options screen – Click to enlarge
What I like best about PicPick is its built-in editor, which gives you a ton of options for drawing shapes, arrows, and text on top of your captures. Yes, you can do some of this in the Snipping Tool, but it’s just not as powerful or elegantly designed. PicPick’s editor even lets you add watermarks to your images.

PicPick Editor – Click to enlarge
When choosing a screenshot method, the most important factor is the ease of use. I find that hitting Shift + Print Screen with PicPick (to grab a portion of the screen) is the fastest and easiest way for me to grab screens I can paste into an app and show others. However, for others, using free features such as the Snipping Tool may be more than adequate.®