Last updated on August 7th, 2025 at 11:59 pm
Do you want to transfer emails from Freenet mail account to Gmail profile? If this is the case with you, you will find the solution here. Through this article, we will explain the methods to Migrate Freenet Mail emails to Gmail account. So, let’s start.
Freenet Mail – A reliable webmail service provided by Freenet AG, a leading telecommunications and Internet service provider based in Germany. This Mail service offers powerful features that users expect from a modern email platform.
In addition, it complies with Germany’s strict privacy laws, giving it strong data protection and making it one of the most secure email platforms.
Users can access their Freenet mailboxes via the web interface and through mobile email apps, and desktop email clients with IMAP/POP3 settings.
Also Read: – How to Export Emails from Mail.com to Gmail account?
What is Gmail?
Gmail is a free email service from Google that allows users to easily send, receive, and manage emails. It is a popular choice as a webmail platform for both personal and business use.
It includes 15GB of free storage, robust spam filtering, useful tools like Smart Compose, email labels, and many other options. Apart from this, Gmail is also known for its security features like 2-step verification and app passwords for third-party app logins.
Why Move Emails from Freenet Mail to Gmail?
Many users choose to move their emails from Freenet Mail to Gmail for several reasons, such as –
- Email Backup: Save a copy of important emails in a separate account for security.
- Account switching: Users prefers a complete switch from Freenet Mail to Gmail for regular use.
- All-in-One Inbox: Many users prefer to combine multiple email accounts data into one Gmail inbox to manage from single platform.
- Free up storage space: Gmail offers 15GB of free space while Freenet offers 1GB. So, to manage this space users also prefers moving Freenet emails to Gmail.
Fetch Freenet Mail into Gmail via POP3 (Manual Method)
- Log in to Gmail, go to Settings (gear icon) → See all settings → Accounts and Import.
- Under Check mail from other accounts, click Add a mail account.
- Enter your Freenet email address and click on Next
- Choose Import emails from my other account (POP3) and again hit on Next.
- Enter these POP3 settings:
- Username: Your full Freenet email
- Password: Your Freenet password
- POP Server: mx.freenet.de
- Check “Always use a secure connection (SSL)”
- Choose whether to keep a copy on Freenet server and assign a label (optional). Click Add Account.
Preform this operation exactly and Gmail will now fetch your Freenet emails automatically.
Limitations of Using POP3 for Freenet to Gmail
- No folder support: Only the Inbox is fetched—Sent, Drafts, etc., are not included.
- Slow transfers: Large inboxes can take a long time to download.
- No email filtering: You can’t choose specific emails or folders to move – everything in the inbox will.
- Limited controls: There’s no mail folder preview or email transfer progress tracking feature available.
Best Solution to Migrate Freenet Mail emails to Gmail
Due to the limitations of using the POP3 method—such as lack of folder support, slow transfer speed, and absence of email filtering—users should use other reliable and efficient methods. The best solution is to use a professional tool like eSoftTools Freenet Mail Email Backup & Migration Software.
With a user-friendly interface and smart features like mail folder preview, progress tracking, this tool provides a much smoother and more controlled migration process.
The tool handles the entire mailbox migration from Freenet Mail to Gmail with minimal effort. It supports direct email transfer from inbox, sent, drafts, and custom folders. It migrates emails while maintaining original folder structure and ensuring complete data integrity.
Users can also apply filters (such as date ranges or specific folders) to migrate only necessary emails.
How to Use the Freenet Mail Migration Tool to Transfer Emails to Gmail?
To migrate emails from Freenet Mail to Gmail apply these simple steps on your machine: –
- Download eSoftTools Freenet Mail Backup & Migration Tool on your Windows PC.
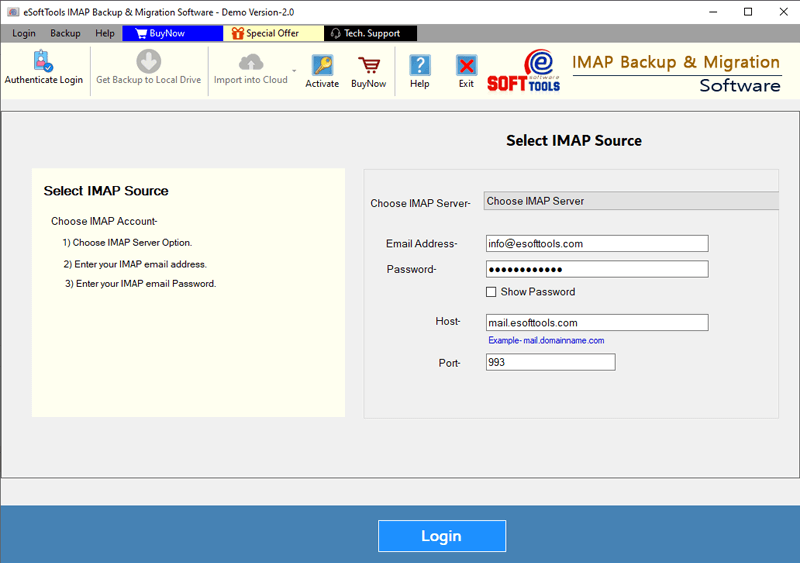
- Install and launch the software and enter Freenet Mail account details, including email address, app password, IMAP host (mx.freenet.de), and port number (993).

- The tool will load your Freenet mailbox. Select mail folders you want to migrate, such as Inbox, Sent, or any other available folders.

- Click on Import to Cloud, then choose Import to Gmail as your destination platform. (Other options like Yahoo, Office 365, or generic IMAP are also available.)

- Enter your Gmail login credentials or app-specific password and click on Authenticate Login to authenticate your account securely.
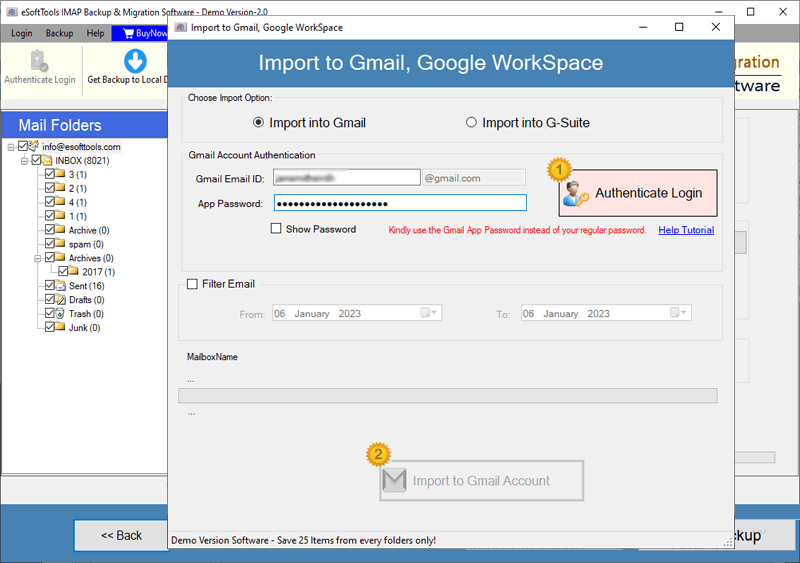
- Optionally, you can filter emails by date or create a new folder name within Gmail for storing the imported emails.
- Finally, click Import to Gmail to start the Freenet email to Gmail migration process.

This software will migrate Freenet Mail emails to Gmail Account while preserving original folder structure and email integrity throughout the transfer.
Conclusion
Many people nowadays want to transfer emails from Freenet Mail to Gmail. Although the manual POP3 method can be helpful, it has several drawbacks such as slow speed and minimal customization.
So, the best and easiest way is to use a tool like eSoftTools Freenet Mail Backup and Migration software. It lets you transfer emails from all your email folders, such as inbox, sent and custom folders, directly to Gmail. Perform the migration while maintaining the entire folder structure and without any data loss. Try this tool now.