It’s one of the most annoying things that can happen on a Windows 11 PC — your Wi-Fi says “Connected,” yet websites refuse to load. You restart your browser, switch networks, and even reboot your router, but the dreaded “No Internet access” message still lingers. Don’t worry — you’re not alone. This issue is extremely common and can happen due to a mix of software misconfigurations, driver issues, or even problems with your Internet Service Provider (ISP).
We’ll break down why this error occurs, and more importantly, how to fix it permanently using proven step-by-step solutions that actually work.
Why Does “Connected but No Internet” Happen on Windows 11?
Before jumping into fixes, it helps to understand what’s happening behind the scenes. When your PC connects to a Wi-Fi network, it successfully communicates with your router. However, if the router cannot connect to the Internet, or if Windows cannot resolve DNS properly, you’ll end up with a local connection only — meaning your computer can “see” the router, but not the web.
Common Root Causes
- Incorrect IP or DNS configuration: A wrong IP address or a corrupt DNS cache can block access.
- Router or modem issues: Outdated firmware or misconfigured settings can disrupt connectivity.
- Network driver corruption: Windows updates or faulty installations may break the Wi-Fi driver.
- VPN or Proxy interference: Some VPNs reroute traffic improperly or block packets.
- ISP outage or maintenance: Even when everything looks fine locally, your provider might be down.
With these causes in mind, let’s move to the fixes — starting from the simplest and progressing to advanced methods.
Step-by-Step Fixes to Restore Internet Access
1. Restart Your Router and PC
Simple, but surprisingly effective. Many connection conflicts clear up after a clean reboot. Unplug your router and modem from power for 30 seconds, then reconnect. Restart your computer afterward. This resets temporary network assignments and can fix DHCP or IP conflicts.
2. Check If It’s a Device-Specific Problem
Try connecting another phone or laptop to the same Wi-Fi. If other devices also lack Internet, the issue lies with your router or ISP. But if only your PC is affected, the problem is local to Windows 11.
3. Run Windows Network Troubleshooter
Windows 11 includes built-in repair tools that can detect and auto-fix network problems.
- Press Windows + I to open Settings.
- Go to System → Troubleshoot → Other troubleshooters.
- Scroll to Network Adapter and click Run.
Follow the prompts — it often resets drivers, reassigns IPs, or identifies misconfigurations automatically.
4. Reset TCP/IP Stack and DNS Cache
Windows uses TCP/IP and DNS settings to communicate with the web. When these get corrupted, Internet access can vanish even though Wi-Fi remains connected. To fix this:
- Right-click Start and open Windows Terminal (Admin).
- Type each command below and press Enter after each:
netsh int ip reset
netsh winsock reset
ipconfig /release
ipconfig /renew
ipconfig /flushdns
Once done, restart your PC and reconnect to your Wi-Fi.
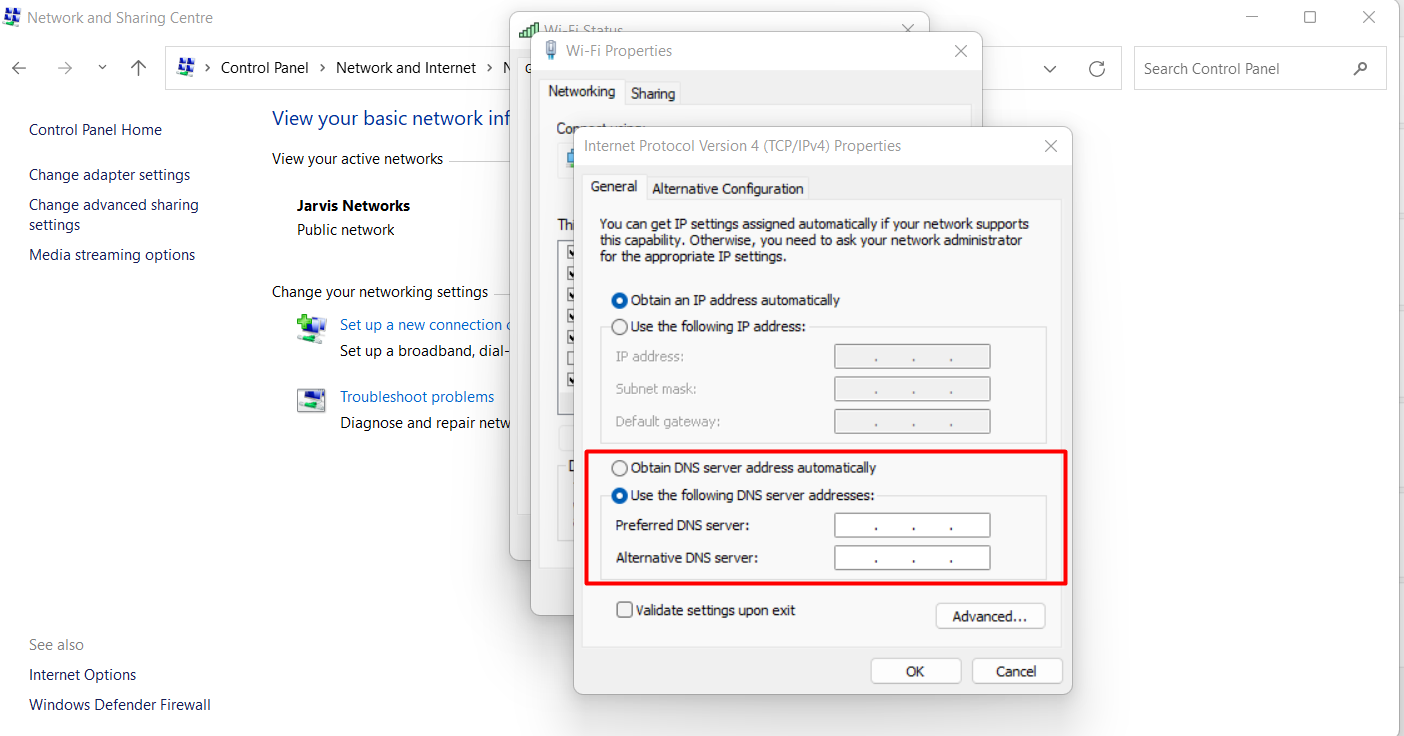
5. Change DNS Server to Google or Cloudflare

Sometimes, your ISP’s DNS server goes down or responds slowly. Switching to a public DNS server can instantly restore connectivity.
- Go to Control Panel → Network and Internet → View Network Status and Tasks.
- Under “Access Type”, you will see the connected WiFi.
- Click your Wi-Fi name → Properties.
- Select Internet Protocol Version 4 (TCP/IPv4) → click Properties.
- Choose Use the following DNS server addresses and enter:
Preferred DNS: 8.8.8.8
Alternate DNS: 8.8.4.4
You can also use Cloudflare’s DNS (1.1.1.1 and 1.0.0.1). Press OK and restart the connection.
6. Disable VPN and Proxy
VPNs and proxy settings sometimes reroute traffic incorrectly. To disable them:
- Open Settings → Network & Internet → VPN and turn off active VPNs.
- Then go to Settings → Network & Internet → Proxy.
- Ensure “Use a proxy server” is toggled off.
7. Update or Reinstall Wi-Fi Drivers
Outdated or corrupted drivers are a frequent cause of “connected but no Internet” issues. Update them like this:
- Press Windows + X → Device Manager.
- Expand Network adapters.
- Right-click your Wi-Fi card and choose Update driver.
- Select Search automatically for drivers.
If no update is found, visit your laptop manufacturer’s website and download the latest network driver manually.
8. Reset Network Settings Completely
If all else fails, perform a total network reset. This wipes all Wi-Fi networks, adapters, and settings to default.
- Open Settings → Network & Internet → Advanced network settings.
- Under More settings, select Network reset.
- Click Reset now and confirm.
After your PC reboots, reconnect to your Wi-Fi manually.
9. Check Router Configuration and ISP Status
- Login to your router’s admin panel (usually
192.168.1.1or192.168.0.1). - Check if DHCP is enabled under LAN settings.
- Verify that your Internet connection (WAN) is active and assigned a valid IP.
- Update the router’s firmware if available.
- If all looks fine, contact your ISP — there might be a local outage.
10. Temporarily Disable Security Software
Some antivirus or firewall tools block Internet connections after updates or false detections. Temporarily disable your security suite to test connectivity. If it works after disabling, whitelist your browser or network driver process.
Additional Fix: Manually Set IP Configuration
In rare cases, your device might fail to obtain an IP automatically. Setting it manually can solve it:
- Right-click Wi-Fi icon → Network & Internet Settings.
- Click Advanced network settings → More network adapter options.
- Right-click your Wi-Fi → Properties → IPv4.
- Select Use the following IP address and enter:
IP address: 192.168.1.10
Subnet mask: 255.255.255.0
Default gateway: 192.168.1.1
Use your router’s IP range. Then reapply DNS (8.8.8.8) as before.
Preventing Future Connectivity Issues
- Regularly update network drivers and Windows security patches.
- Keep router firmware updated.
- Don’t overload your Wi-Fi with too many simultaneous devices.
- Reboot router monthly to clear cache and logs.
- Avoid using third-party network “optimizer” tools that alter IP configurations.
Expert Tip: Check Event Viewer Logs
If you’re tech-savvy, you can dig deeper by checking Event Viewer → Windows Logs → System for “DHCP” or “DNS Client” errors. This helps you pinpoint the exact failure point — especially useful in office networks.
Frequently Asked Questions (FAQ)
Why does my Wi-Fi connect but not access the Internet?
It usually happens when your PC connects to the router but the router cannot connect to your ISP, or when your DNS or IP settings are corrupted.
Can outdated network drivers cause no Internet?
Yes. Corrupted or outdated drivers can prevent Windows from properly communicating with your network adapter.
What DNS should I use for better reliability?
Google DNS (8.8.8.8, 8.8.4.4) and Cloudflare DNS (1.1.1.1, 1.0.0.1) are fast, reliable, and safe for general users.
Will resetting the network delete my saved Wi-Fi passwords?
Yes. A full network reset removes all saved SSIDs, passwords, and VPN profiles. Ensure you have your credentials before resetting.
How do I know if my ISP is down?
If no device on your Wi-Fi can access the Internet, and your router’s WAN light is red or blinking, it’s likely an ISP issue.
Conclusion
“Wi-Fi connected but no Internet access” on Windows 11 can stem from many causes — from misconfigured DNS settings to deeper network conflicts. But the good news is that most cases are fixable using the steps above. Restart your network equipment, refresh DNS, update drivers, and you’ll usually be back online in minutes.
By keeping your firmware updated and avoiding unnecessary VPN or proxy setups, you can prevent this issue from returning. Stay connected — and bookmark this guide for the next time your Wi-Fi decides to misbehave.